
Have you wanted to teach online, but didn’t know where to start?
I know, I know. I hear you. It sounds like a great idea, but how do you get going?
I’ve put together this post to help TakeLessons Teaching Partners prepare to become an online teacher.
Hi, my name is Steven Cox. I’m the Founder and CEO of TakeLessons.com. We’re a community and marketplace where consumers find, book, and take lessons ranging from music to languages to career education. Our instructors cover diverse subjects ranging from sewing and parkour; from Excel and Powerpoint, to SAT prep; from guitar and singing to conversational French and magic lessons.
Over the past 9 years, our team has helped over 100,000 freelance instructors and studios market themselves, earn more money, and more importantly, make a real difference in the lives of people around the world.
Here’s what you’re going to learn in this post:
- The benefits of teaching online
- The pitfalls when you teach online, and how to avoid them
- How to get your physical space set up
- What equipment you’ll need to deliver a WOW experience
- How to help students get set up for their online class

Throughout the post, you’ll also see quotes pulled directly from our TakeLessons Partner Community that will give you their tips and feedback about online lessons.
Other instructors who are not part of TakeLessons will also find the post valuable, but it was specifically designed to help professional TakeLessons instructors.
This post doesn’t cover how or what to teach. It’s assumed the instructor already has course materials prepared.
Let’s get started!
Why Teach Online?
TakeLessons Teaching Partners have an internal passion for helping students learn, grow, and become the best they can be. Years ago, most private lessons instructors taught students in their city. But the problem was that there may be an oversupply of instructors or an undersupply of students. In either case, this makes it difficult for an instructor to make a good living doing what they love to do.
Today, the world is shifting into a new paradigm. More and more people are opting to learn online. In a white paper by The Learning House (2014), it’s estimated that almost 70% of college students are either studying fully online, or have at least some of their classes online. Kids are growing up with learning online not as a novel experience, but a familiar and common reality.
New learning technologies are making it easier to connect, communicate, and collaborate. Each year, companies compete to deliver faster Internet connectivity at lower prices. New breakthroughs in data transmission and an increase in camera quality helps provide a better learning experience than ever before.
Ruth. Instructor: Illinois. “I need some advice on how to set up for online lessons! I have over 35 students that are all in home or in studio, however, I will be moving to Colorado end of March and would love to keep as many as I can! Any advice on best platform, cameras, what I, or the student will need to have successful online lessons? Thank “you!!
At TakeLessons, we have continued to see an increase in student demand for online lessons. In 2013, online lessons made up less than 2% of total sessions. In 2016, it will be over 35%. By 2018, the majority of sessions will occur online.
Let me say that again…
ONLINE LESSONS GREW FROM 2% IN 2013 TO OVER 35% IN JUST 3 YEARS

In some categories like Tutoring or Languages, students opt for an online experience almost 80% of the time. In other more traditional categories such as music or sports, online lessons still account for 15-20% of the business.
What’s more telling is that when we compare retention rates for online students vs. in-person students, we see no difference in retention between the two. This tells us that students are benefitting from online at about the same level as in-person.
Reina. Instructor: San Diego, CA. I LOVE online lessons. I teach voice to about 15-20 students using my iPad. There was a learning curve at first and I had to readjust how I teach some subjects but now that I’m in the swing of things it’s awesome. And, my online students are progressing at the same rate as my in studio students.
Students and TakeLessons Partners tell us they chose online over in-person for several reasons:
Convenience. Online lessons, as opposed to in-person lessons, can save 30-45 minutes in drive time. Instead of sitting in traffic or rushing to be on time, both students tell us that online simply makes it easier for them to get to their lesson and helps them stay more committed to the process. That extra 30-45 minutes is very important to a busy mom who is rushing between multiple activities for several kids. We also heard that students were more likely to find a slot that was more preferred when opting for online.
Choice. The power of online is that consumers no longer have to choose from the best person in their area. They can choose from the best instructor anywhere in the world. This allows for a more personalized experience for the student because they are more likely to find the instructor that best suits their individual goals and tastes.
Class Tools. Instructors shared with us that they find value in the tools associated with online lessons. They now can share digital documents back and forth and record lessons for students to reference once the class is over.
Leverage. Teachers also like the ability to leverage their time by teaching more than one person. Theoretically, this lowers the per-student price while maximizes instructor income.
Expanded Reach. While online gives more choice to students, online classes gives instructors a way to expand their reach. With local lessons, an instructor is tethered to the 2-10 mile radius around their neighborhood (and in the case of a city like New York City, the radius is much smaller). With online, an instructor can attract students from all over the nation and the world. As an example, during the month of February 2016, TakeLessons placed 19 students with the same Partner. None of the students were within 100 miles of her. This teacher – and many like her – are able to address a larger market size by using the power of online.
In summary, the world is changing and consumers are getting more comfortable learning through the web due to convenience and choice. TakeLessons Partners who establish themselves now as an online instructor will yield results for years to come. Those that do not may miss one of the biggest opportunities of their teaching career.
How to Overcome the Challenges with Teaching Online
When we spoke with TakeLessons Instructors, there were a few challenges with teaching online. In this section, we highlight them and provide suggestions on how to solve for them.
Challenge 1: The Quality of the Online Lessons Experience
Since this is a new experience for many students, you have to overcompensate to ensure a high level of quality. You only have a couple chances with most students, so make sure your mindset is going above and beyond in those first few sessions. Make sure your students have a super-high quality experience.
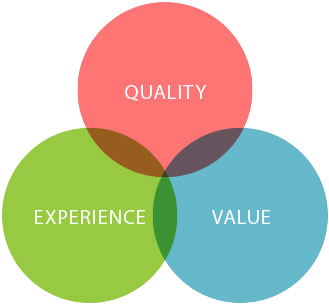
Here’s the formula: High quality means a better experience, which creates a better perceived value. Of course, more value means higher retention.
For some teaching verticals, such as music or sports, there are nuances that better served by in-person coaching. The stance of a hitter, the swing of a golf club, the hand position on the frets of a guitar, and the posture on a piano. All of these are examples of subtleties that make in-person teaching a wonderful experience.
If you teach music, being able to play along with a student is important. Unfortunately, we all have to deal with latency, which is the small amount of time it takes to transfer audio over online learning platforms. That’s still a real issue. However, as systems continue to speed up, eventually the latency gap will get smaller and smaller.
Sometimes, an in-person experience is preferred, but it isn’t an option. So, the next best thing is to have an experienced instructor helping the student online.
Nicholas. Music Instructor from Atlanta, GA. “You lose out on the ability to touch your student’s arms to point out what muscles they should use (cello/violin/viola) and a bit of that personal feeling that only in person lessons have – but it is a great way to save money and time for both parties. I have found it to work well. You also have no traffic concerns – which is the biggest plus. I like it best when I have met the student in reality first, but that is a luxury. Meeting for a few in person lessons, even if it a bit inconvenient, seems to give the online lessons a lot of that missing personal feeling.”
Your goal, as an online instructor, is to apply your subject matter expertise to the new online medium and find ways to increase the overall learning experience. This may mean that you have to supply additional download material or perhaps learn how to angle the camera better in order for you to see how to help the student. As you become more adept to teaching online, you’ll find tips and secrets that will help your students get the most from their lessons.
As with any class, most of the quality of experience is determined by preparation and commitment. The more the instructor is prepared and the higher the level of commitment from both sides, the better the lessons will be.
Challenge 2: Online Classes Can Be Impersonal By Nature
Online, as a medium, is not as personal as, well, in-person. There’s no substitute for being able to stand with a student and guide them through a learning experience.
Kathy. TakeLessons Instructor. “I agree wholeheartedly with Alexis. I have online students and as hard as I try to duplicate the in-studio experience it’s not the same. That being said we live in the age of technology and we have to adapt or miss out on an entire demographic. Make sure your Internet connection, and theirs, is the fastest available. This helps to eliminate dropped calls and delays. Also, I suggest both teacher and student using an external Mic such as the snowball Mic, and external speakers to enhance the sending and receiving quality of the music.”
How to Make Your Classes More Personal. That being said, here are a few tips that will help you make your online lessons a little more personal:
Your studio Setting can help make it personal. Lights, Camera, Action! Set your studio up in a way that lowers the inherent disadvantages of online. Have a great camera with high definition. Arrange your lighting to remove shadows and make it easy to focus on you. Lower background noise from fans, heaters, pets, and other people that disturb the experience. By taking the time to set your studio up the right way, you’ve allowed yourself to focus on the connection with your student.
Be Real. Just as you would do with an in-person class, build bonds you’re your students through being genuinely interested in helping them succeed. Tell them stories of your own struggles and how the lessons you learned can be applied to their learning process. Set aside the time at the beginning to learn about the student’s WOW’s (Wants, Obstacles, and Wins). Find out what they want and the obstacles standing in their way. Help them get wins with every session and encourage and celebrate as many wins as possible.
Record the Classes. At TakeLessons, by the end of July, you’ll be able to record the student’s lessons for them and store them in ths students’ TakeLesssons account. This is huge. It gives you more ‘face time’ with them – even when you’re not around! Studies have shown that the more someone interacts with another person on a screen, the closer the psychological bonds. So, record those classes and build that relationship.
Your Attitude Shapes the Experience. Finally, remember that your students will pick up on your attitude. If you have a negative view of online lessons, your student will struggle with the experience. However, if your actions, body language, and words convey confidence and acceptance of the platform, they will mirror your attitude (most of the time) and have a wonderful experience. So, commit to viewing online lessons as an incredible way for you to help others and expand your business. Your students will thank you!
Here is a PDF published by the National Education Association designed to provide an overview of the development of an effective online education system, focusing particularly on the skills teachers need to teach effectively online
Challenge 3: Technical Issues and Latency.
The largest area of concern we heard from instructors were the myriad of technical issues involved when getting set up to teach. Not only do you, as the instructor, have to get your side right, but the student has to have their side set up as well.
There’s no question that an instructor who is new to online classes will face hurdles – especially if the teacher is, ahem, “technically challenged”. The best single piece of advice I have for you is to pick one platform and master it. Don’t try to use several teaching platforms, each with their own nuances. Pick one, get good at it, and scratch those technical challenges off your list.
To help you get set up the right way, check out the next section.
How to Set Up Your Online Teaching Studio
To get your online classes studio set up just remember the Two E’s: Environment and Equipment.
The “Three E’s” give you a guideline and checklist on the easiest way to get your online teaching studio set up for online classes. Let’s cover each of them.
Your Physical Environment
The first step in getting your online studio set up is to establish the right physical environment. I’m assuming most of you are TakeLessons Instructors and have a physical studio set up. Many of you have the studio set up in your home. That’s great! You’ll use that same space for online lessons.
Susanna. Instructor from Pittsburgh. “I teach online lessons and use the following. I have a Mini Mac plugged into our Bose system. I use a Logitech webcam and have a Blue Yeti microphone. I use our TV for my screen. I teach out of my living room and I use a land line directly connected instead of wifi. I also have a wireless mouse and keyboard that works with the Mini Mac. I also have a tripod I put the webcam on so I can adjust the height for lessons. I teach strings, so I stand for violin and viola lessons, but sit for cello lessons. I also have two floor lamps I got from Ikea I use to light the room when I am teaching online. Otherwise my room is too dim.”
Here are some helpful tips to getting the right online studio set up.
Pick One Place. Pick one place in your home that you can use for online lessons. This could be a spare bedroom, an office area, or even your living room if you must. Just remember that the area should be quiet and give you the privacy you need to complete your sessions. But what do you do if you have a roommate? TakeLessons Partner, Rosita Ruiz, suggests that you hang or tape a sign on the door letting your roommate or spouse know whenever a session is going on.
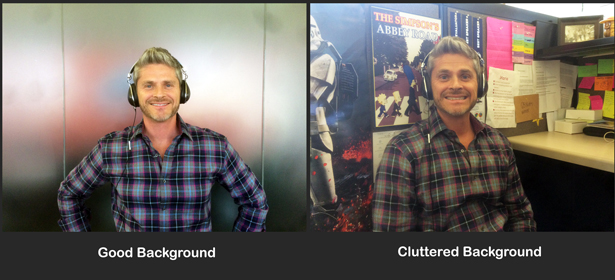
The background. Make sure that your background is uncluttered and free from distraction. If you can, set your camera up to where the focus is on you. The less distraction the better. Some instructors buy a roll of solid paper from a photography supply store and hang it in the background. This gives a more professional look. While you’re at it, make sure your computer desktop is professional and clear of clutter–you’ll be glad you did when you start screensharing.
Check out this video for more tips about the background.Here are some helpful tips to getting the right online studio set up.
Your Clothes. Depending on your background, make sure your clothes and skin contrast against the background. If you have a lighter background, try slightly darker clothes, and vice versa. If you’re shooting against a white wall, then avoid wearing a white shirt. It makes you look weird.
Lighting. Your studio should be well lit in a way that provides a soft light for your camera to pick up and removes shadows. Here is a great video from the gang at Wistia that will help you set up an inexpensive light source.
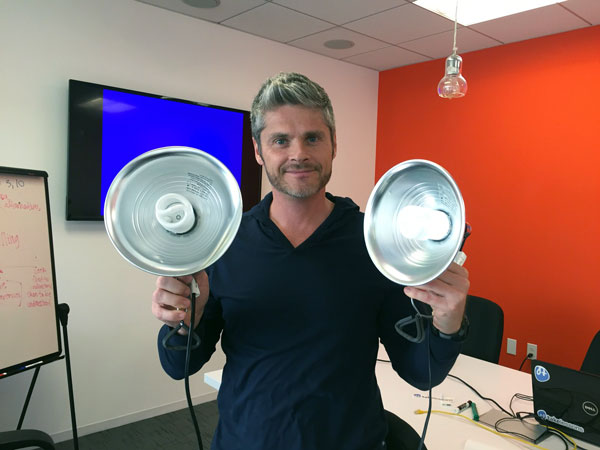
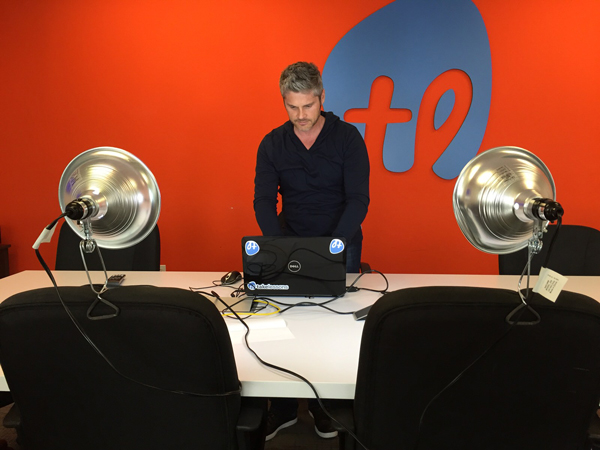
Here is a picture of our DIY lighting set up we put together in a few minutes. It cost us less than $20. For this demo, we just attached the lights to two chairs pointing at the subject. Notice, the lights are behind the laptop (where you’re giving your online lessons).
Noise, Echo and Reverb. Be aware of any external noise that would create distraction. Things like fans, heating ducts, appliances may create unwanted noise.
Also note that your room may produce echo that will make it more difficult to hear you. We suggest you ‘deaden the room’ a bit by using sound dampening tiles. If you don’t have access to those, try furniture with soft surfaces (cloth vs. metal, for example) and blankets.
Step 2: Getting the Right Equipment
Part of getting set up is to have the right equipment for success. For this section, I’m assuming you will be using TakeLessons Classroom as your online education software. Here’s what you need:
Computer: In my view, there are three things in life you shouldn’t skimp on: a great bed, comfortable shoes, and a fast computer. Get the fastest, latest computer your budget will allow. I prefer laptops to desktops for the portability, and I prefer Macs to Windows-based. The reason is that I’ve found Macs to be more reliable and easier to use. Both platforms will work, but a great 15” MacBook Pro is my choice. A 13” works well, too.
Opt to get the Belkin ethernet adapter that allows you to connect directly into your Ethernet on your modem or router. You’ll have better success if you ‘hardwire’ directly to your Internet source vs. going wireless.

Susanna. Instructor from Pittsburgh. “Most of my students use a webcam with their computer or laptop. They need to be in a well lit room and will need to be further back from the camera than they think. I do have a student who uses her IPad and sets it up on another stand or something so I can see her. Another student set up a webcam on her TV. So far, it has worked well for me. I have 11 online students so far and picked up all of them in the last two months from TakeLessons.”
Computer System Requirements from a TakeLessons Help Article
PC users should have:
- Windows 7 or newer with the latest updates installed
- Dual-core 2.4GHz CPU or faster (2GB of RAM recommended)
- Video Card: at least 64MB of video memory
- Sound Card: at least 16-bit
- Cable modem, DSL, or better internet connection
- A working onboard microphone, or externally connected microphone
- A working onboard webcam, or externally connected webcam
Mac users should have:
- Mac OS X 10.8 (Mountain Lion) or newer with the latest updates installed
- Intel processor (2GB of RAM or better recommended)
- VIdeo Card: at least 64MB of video memory
- Sound Card: at least 16-bit
- Cable modem, DSL, or better internet connection
- A working onboard microphone, or externally connected microphone
- A working onboard webcam, or externally connected webcam
Get the Right Browser
Have you tried using GoToMeeting or Skype but gotten stuck because you and/or your student had to download software or install it first? It’s a real pain.
TakeLessons Classroom solves that problem and does not require you to download any software. We produce the session inside of your web browser.
Use Google Chrome as your browser. That’s all you need. TakeLessons Classroom doesn’t support Safari or Internet Explorer.
What about Tablets?
Tablets can work, but we recommend using a laptop. With tablets, you have to connect over wi-fi, which can be spotty. If you must use a tablet with Chrome, you can, but it may be a less-than-desirable experience.
Internet Access
Your biggest point of frustration could be with the speed of your Internet being piped into your studio. Think of your computer as a car, and your ISP as the freeway. You can have the fastest car on the market, but if the freeway is narrow and clogged with other vehicles, you’ll never be able to race ahead. It’s the same thing with ISP’s. Get a good one with plenty of space (bandwidth).
Here in San Diego, I’ve chosen Cox Cable as my Internet Service Provider. They have the most reliable, fastest service for the price. I pay $80 a month and can regularly host video calls with 2-3 people with no issues.
Let’s assume you plan on teaching private lessons and small group classes. When choosing your ISP, you’ll want to look for speeds where download is at least 2Mbps and your upload is 512kbps.
“Look for minimum speeds of 2Mbps download and 512kbps upload”
I know it’s more expensive to order faster service, but look at it as an investment (and it’s probably a tax write off for you). You should be able to make up the cost of Internet for a year with one extra happy client that stays with you because they’re having a wonderful experience.
When you are teaching live, close all other applications that are connected to the Internet, other than the browser that you’re teaching through. This includes messenger apps, Netflix, YouTube, etc. If you are downloading or transferring files, cancel the transfer until after the video session is over.
Also, as I mentioned above, be sure to ‘hardwire’ into your modem/router. This means attach the Ethernet cable directly to your laptop using a dongle (for a Mac). This normally beats speeds you get from connecting wirelessly.
Here are a few links that will help.
This is Google’s view of which local providers stream HD YouTube videos well. It gives you an indication of quality.
This is how Netflix views the service providers. If the service provider scores high here, there’s a good chance they will be good for your online business.
Finally, here is a link where you can test your current internet speeds.
Your Camera
I’m asked all the time whether the teacher can use the webcam that came with their computer. Technically yes, you can use it, but the video quality for your students will suffer.
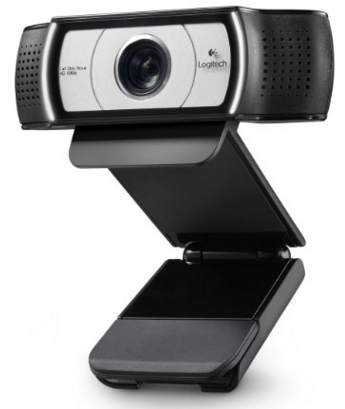
My recommendation is to buy the Logitech C930e. It’s a HD camera that plugs into your computer’s USB port. You’ll be happy you upgraded. It costs about $95. If you decide on another camera, make sure it has a minimum resolution of 1280 x 720.
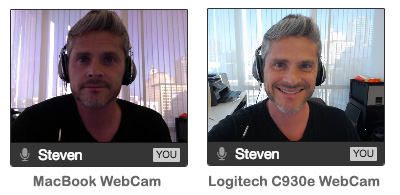
Here is the difference between the internal MacBook webcam (on the left) and the Logitech C930e (on the right). I didn’t make any adjustments whatsoever. It’s pretty obvious which one rocks.
In addition to the Logitech, I recommend you use a little program for the Mac called WebCam Settings. It helps you dial in your webcam to give an even greater picture quality. It costs $8 and can be found at the Apple download store.
Finally, remember that your computer screen is below eye level. So, when you’re listening to your student, it’s OK to look at your computer monitor. However, when you’re speaking back, do your best to look directly in the camera as much as possible. This gives the student a good feeling that you’re speaking directly to him or her. If you look into your monitor all the time, it will make it just a bit less effective.
Microphones
 I’m a big fan of the Blue Yeti USB microphone ($110). It sounds great and allows you to choose between several settings, depending on your need.
It has a cardioid setting, which is better for voice alone where the instructor is speaking into the mic (think language instruction, tutoring, etc.).
If you’re using instruments (such as guitar lessons), then switch over to the Omnidirectional setting, which will allow the mic to pic up other sounds surrounding the mic.
TakeLessons Instructor, Phillip Fullerton, also points out, “You can use it with the attached tabletop stand or you can attach it to a mic stand, which makes it easier to adjust the position of the mic“.
Another cool feature about the mic is that you can plug your portable headphones directly into the bottom of the mic. This allows you to get a great mic and a separate pair of headphones.
Also pick up a foam windscreen for the Yeti. They are $10-$20
If you don’t need the Omnidirectional setting, then check out the Blue Snowball. It’s another great mic, and it’s priced below $50.
Headphones
I won’t get into all the details of headphones, but get a decent pair. Some people prefer over the ear headphones while others prefer in-ear. Really, buy something that feels good to you. You’ll be wearing headphones for hours a day, so a decent pair that is light and sounds good will help with ear fatigue. Headphones are highly recommended if you plan on teaching group classes online–it helps prevent feedback when multiple students start speaking at the same time.
I favor brands like Shure, Audio Technica, or Sony. Fender also has started making in-ear monitors that professional musicians use on stage. Prices start at $99 for the Fender headphones.
A friend of mine purchased the MEE M6 In-Ear Monitors and loves them. They’re priced right at $50.
Headset
If you’d rather get a headset with headphones and a mic in one unit, then pick up the Logitech ClearChat USB Headset or the Plantronics PLNAUDIO478. Neither will have the quality of a good separate mic and pair of headphones, but they are convenient and cost-effective.
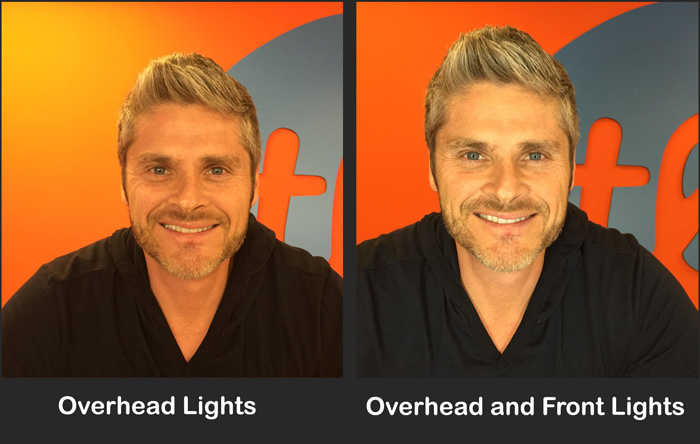
Lighting
Now, let’s talk lighting! So many people overlook this critical component. You can have the best mic and camera, but if your lighting sucks, then the student experience will also suck.
I’ve personally made the DIY lighting kit that was suggested in this Wistia video and, honestly, it works pretty well! It’s really ugly, but if you’re on a budget, start here. I was able to rig up a set with great bulbs for about $30.
Finally, here is a short video shot on an iPhone that also shows you the difference of having even just a couple cheap lights.
The next step up would be a Softbox lighting kit. This provides you with beautiful, soft and even light. Depending on how bright the rest of your studio is, you can opt for a 700 watt system for under $80.
You might also consider the Studio Pro 2,000 watt softbox system. I purchased this one and really like it. I can dial up or down the amount of light that I need for every situation. It’s more costly, but it’s more versatile. ($138.95 for two). You can also just start with one 1,000 watt softbox ($68) and place it facing you, but behind your webcam.
If you want to move one more step up, then I recommend buying a LED light kit. The benefit of LED is that they last longer, use less electricity, and give off almost no heat. They are more expensive, but if you’re planning on doing a lot of online sessions, staying comfortable and not worrying about the heat may be just what you’re looking for. Prices range from $150 for one LED light panel to $300 for two.
Helping Students Get Set Up
When helping students, first understand how fast their internet connection is. You can have them run a test at http://www.speedtest.net/. Hopefully, they have at least 1.5Mbps Internet speed. When speeds drop below 1Mbps, there is a higher risk for dropped sessions.
While you can’t control what speed they buy, at least you know going in whether you can expect connectivity issues.
Also, coach the student on how to get the most from their connection. If the student is on an online session, their family members should not use streaming services like Netflix or YouTube until after the session is over.
The rest of the student’s equipment is dependent on what they’re learning and their budget.
If the student is mostly participating through audio (subjects such as languages) or mostly watching you (arts and crafts, magic, Excel or Powerpoint training), then you can get by with cheaper equipment. The webcam in their computer will work, as will their audio. They can also use standard earbuds, but make sure the earbuds have a mic. Most students will already have a decent pair of earbuds with a built-in microphone.
Conclusion
Here at TakeLessons, we’re certainly seeing an overwhelming movement towards online lessons. It’s our goal to help you make a great living teaching, and I hope this post has helped you understand the benefits of teaching online while avoiding some of the pitfalls. You also learned how to set up your studio environment and what equipment might best serve your needs. Finally, I gave you some tips on how to help your students get set up for online lessons.
If this article has been helpful for you, I’d appreciate if you share it out to other instructors.
Sending you love,
Steven
Great article, I should show it to my girlfriend, she wants to give online lessons
I’d be delighted if you share it with her, Leo. Thanks!
I cant wait to get started. I take students already from Take Lessons, but would like to be able to teach online as well. Thanks
@harmonicarayes:disqus – teaching online is a great way to expand your business. Let me know how it goes.